Please select the platform to login


In a competitive eCommerce market, capturing your customer’s attention is essential. One of the most effective ways to do this is by highlighting key products using dynamic tags like “New” and “Best Seller.” These tags instantly communicate value to shoppers, guiding their attention toward your newest arrivals or your most popular items.
The good news is that you don’t need coding skills to implement these dynamic tags in Shopify. With the right combination of Shopify’s built-in features, automated collections, and third-party apps, you can set up a fully automated system that highlights your products, improves user experience, and boosts conversions. This guide explains how to add dybamic tags in Shopify step by step, with actionable tips and best practices.
Dynamic product tags are small labels or badges that visually mark a product’s significance on your store. While seemingly simple, they have a profound impact on customer behavior.
When shoppers browse online, their attention span is extremely limited. A tag that says “New” or “Best Seller” immediately tells them which products are noteworthy, saving them time and making their shopping experience easier. Furthermore, dynamic tags help create trust and authority because customers naturally assume that highlighted products are either highly popular or recently launched, giving your store a more professional feel.
Benefits of dynamic tags include:
By understanding their value, you can implement dynamic tags strategically rather than adding them randomly, which ensures they enhance your store instead of cluttering it.
There are several ways to implement dynamic tags without touching code. From manual tagging to fully automated apps, each method has unique advantages. Let’s explore how to proceed in step-by-step guidelines.
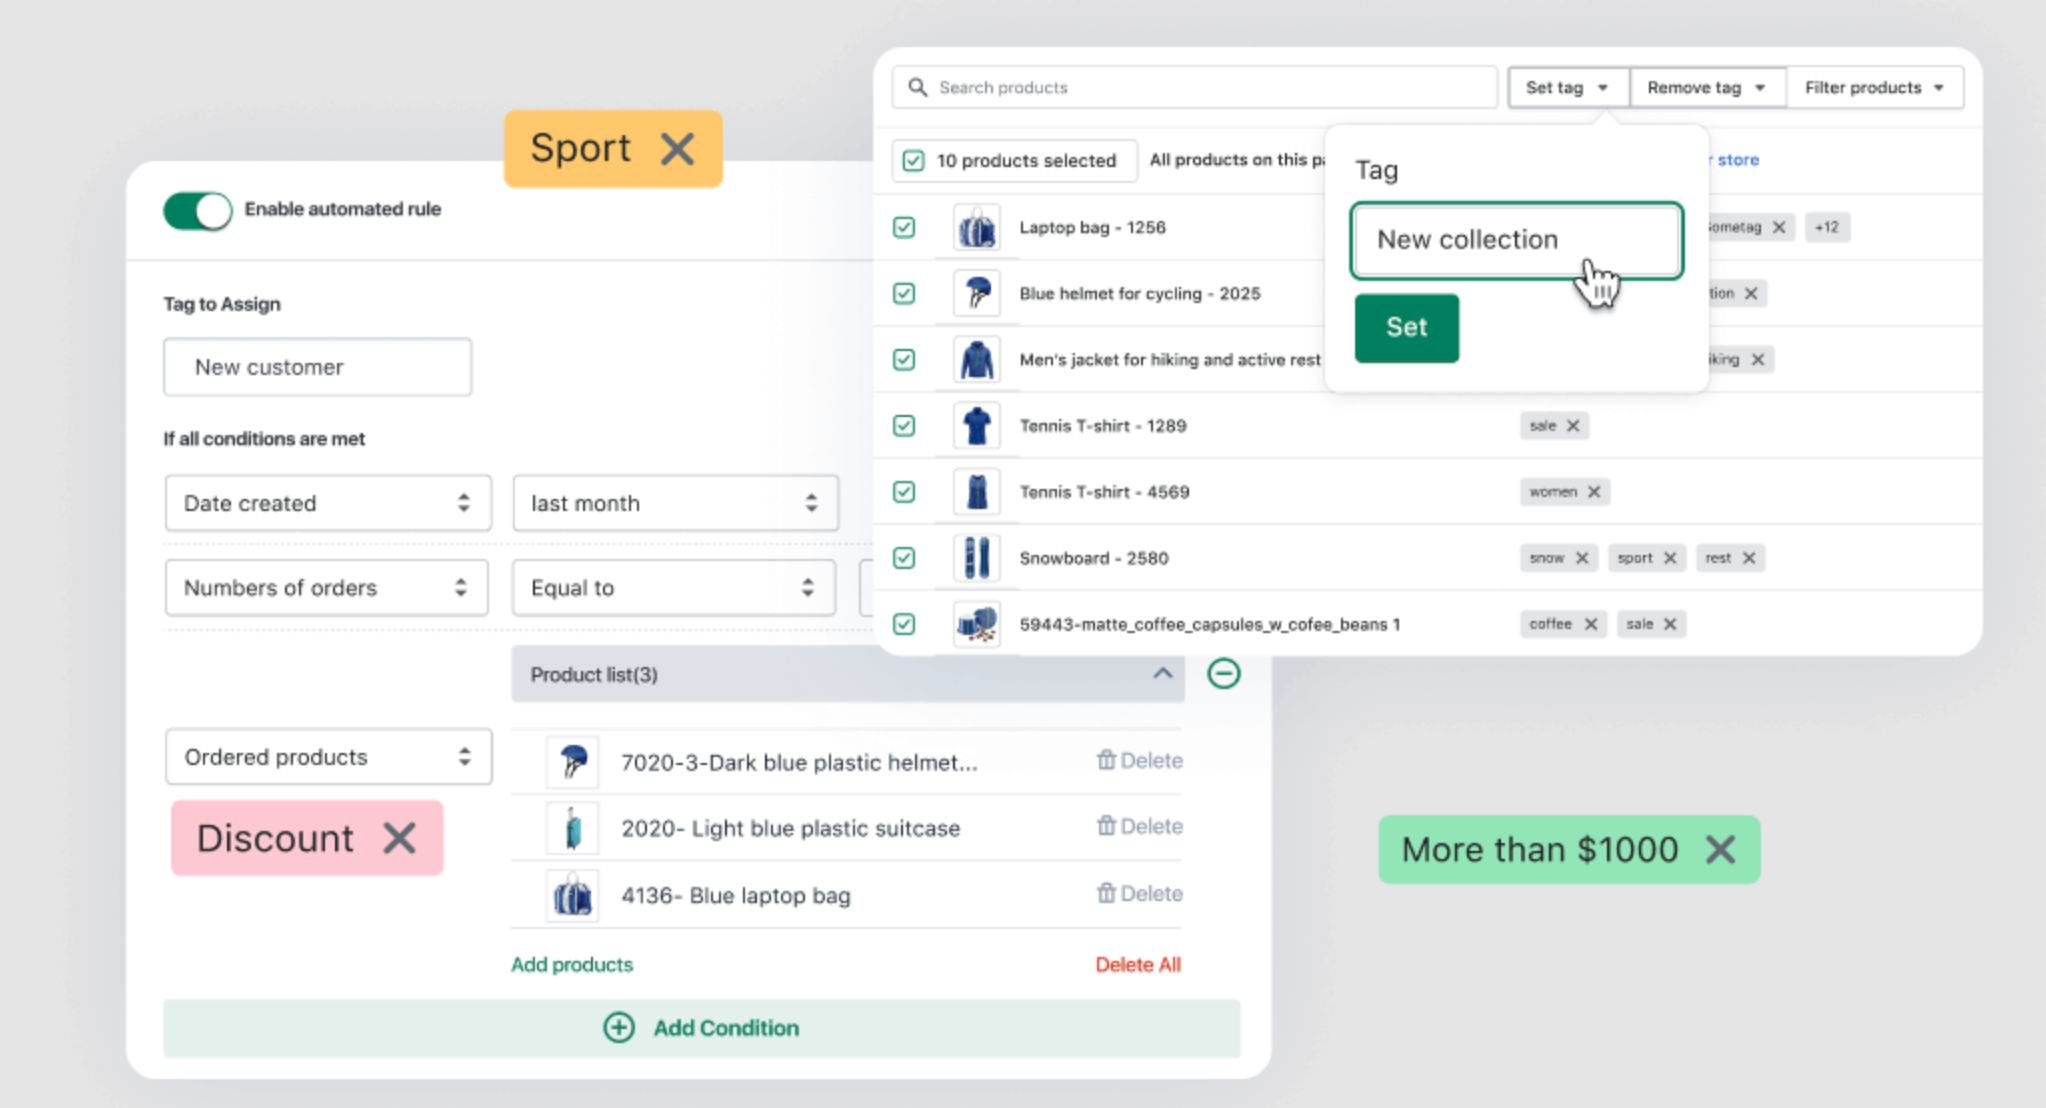
The simplest approach is to manually tag products in Shopify Admin. This method is ideal for small catalogs or if you want full control over which products are highlighted.

After tagging, you can create automated collections or sections in your theme to display these products prominently. For example, a homepage section titled “Best Sellers” can automatically pull products tagged as Best Seller.
Pros:
Cons:
Manual tagging works well for smaller stores, but larger stores or rapidly updating inventories need a more automated approach.
If you want to highlight new products without manually tagging them, Shopify’s automated collections make it simple. These collections automatically include products based on tags, creation date or other criteria.
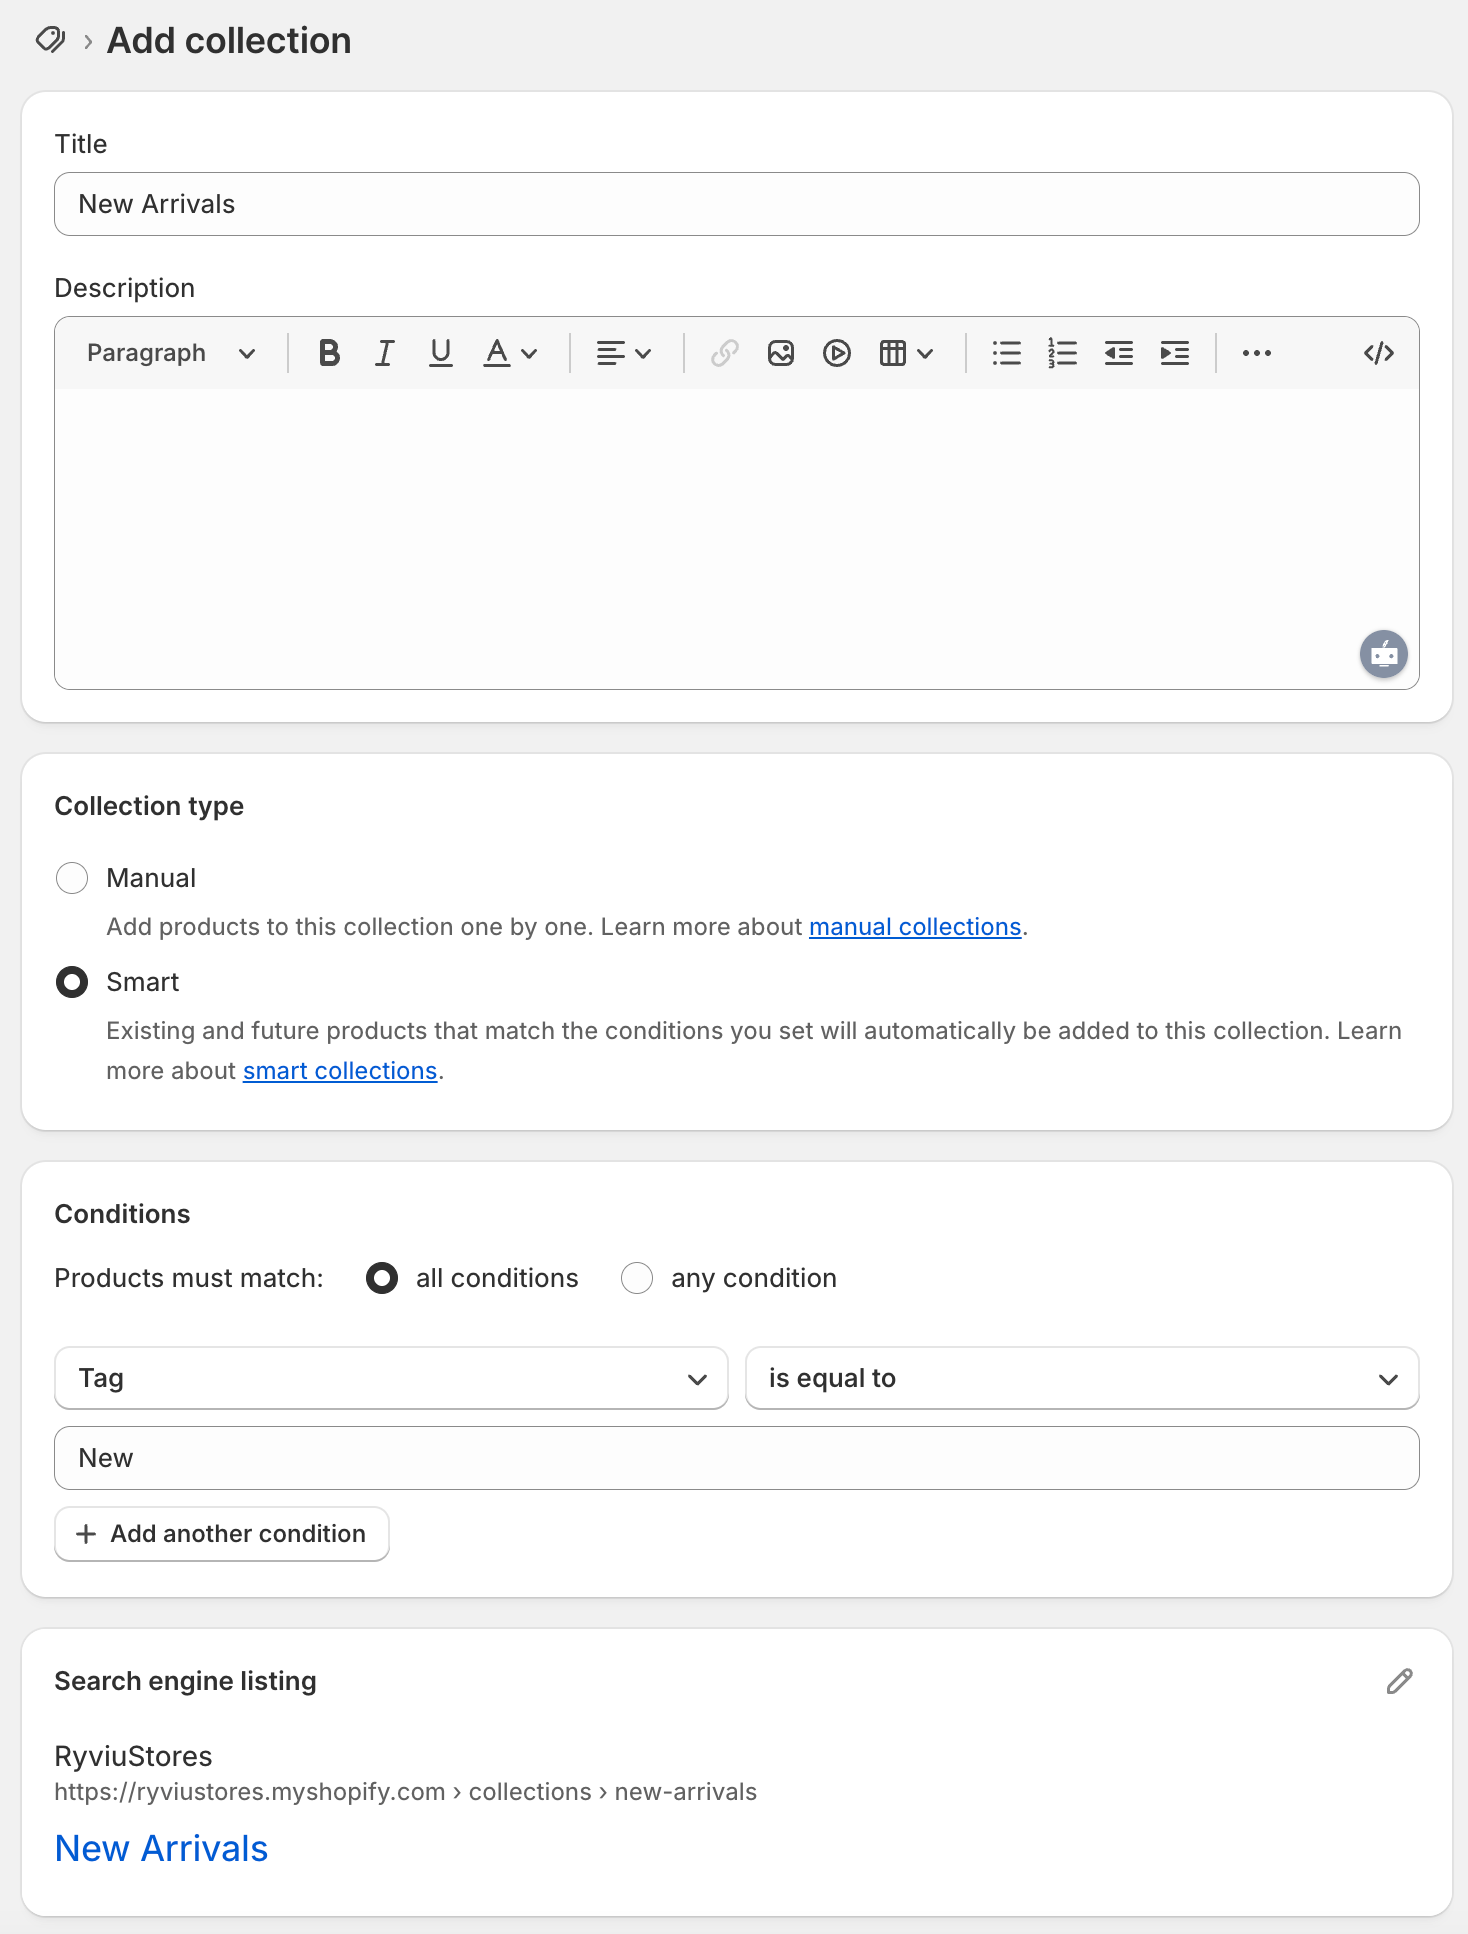
With this setup, any new product added to your store automatically appears in the New Arrivals collection. You can then display this collection in homepage sections, menus, or featured areas, effectively creating a visual “New” badge effect without touching any code.
This approach ensures shoppers always see your latest products while minimizing manual work for store managers.
Besides the method above, if you need more advanced customization on tags, you can use a Shopify app. Below are some Shopify apps automating best-seller identification and badge display without coding:
These apps save time, automatically update badges as sales trends change, and visually highlight your most important products without writing a single line of code.
Even without coding, there are several strategic practices to maximize the effectiveness of your dynamic product tags:
Too many badges can overwhelm customers. Focus on key tags such as New, Best Seller, Sale, or Limited Stock. This creates clarity and ensures shoppers notice the most important products.
Use a consistent color palette, font, and shape across all badges. Uniformity makes your store look professional and builds trust.
Place tags on product grid thumbnails, product detail pages, and featured collections. Avoid covering key parts of product images to maintain clarity and visual appeal.
Automation ensures that tags are always up-to-date. For example, “New” tags should disappear after 14 or 30 days, and “Best Seller” badges should reflect actual sales trends. Apps like ModeMagic or Flair Badges handle this seamlessly.
Even automated systems benefit from human oversight. Schedule monthly reviews to ensure badges are accurate, relevant, and aligned with your sales data.
By combining automated collections, apps, and strategic best practices, you can maintain a no-code dynamic tagging system that enhances your store’s visual appeal and guides shopper behavior.
Adding dynamic “New” and “Best Seller” tags in Shopify doesn’t require coding knowledge. By using manual tagging, automated collections, and no-code apps, you can create an effective system that highlights your newest and most popular products.
The key to success lies in:
With these no-code methods, even non-technical Shopify store owners can implement dynamic product tags that enhance user experience, boost conversions, and create a visually appealing storefront.
Dynamic tags are not only decorative, but they are also powerful conversion tools that guide shoppers toward your most valuable products. By leveraging these no-code techniques, you can make your Shopify store more engaging, professional, and profitable.