Please select the platform to login


A welcome email sequence is one of the most powerful tools in any eCommerce or online business owner’s marketing arsenal. When executed correctly, it does not only greet new subscribers, but it also sets the tone for your brand, builds trust, and drives meaningful engagement that can lead to higher revenue. Automating this process ensures that every new subscriber or customer receives a timely, personalized experience without requiring you to manually send each message, saving you both time and effort.
In this article, we’ll walk through the steps to create a high-converting welcome email sequence that not only captures attention but also nurtures subscribers and guides them toward taking action.
Before diving into automation, it’s crucial to understand why a welcome email sequence is so effective. Many businesses treat it as a single introductory email, but a truly high-converting sequence is a carefully planned series designed to build relationships, demonstrate value, and ultimately drive conversions.
Understanding these goals helps you structure a sequence that achieves maximum impact, which we’ll explore next.
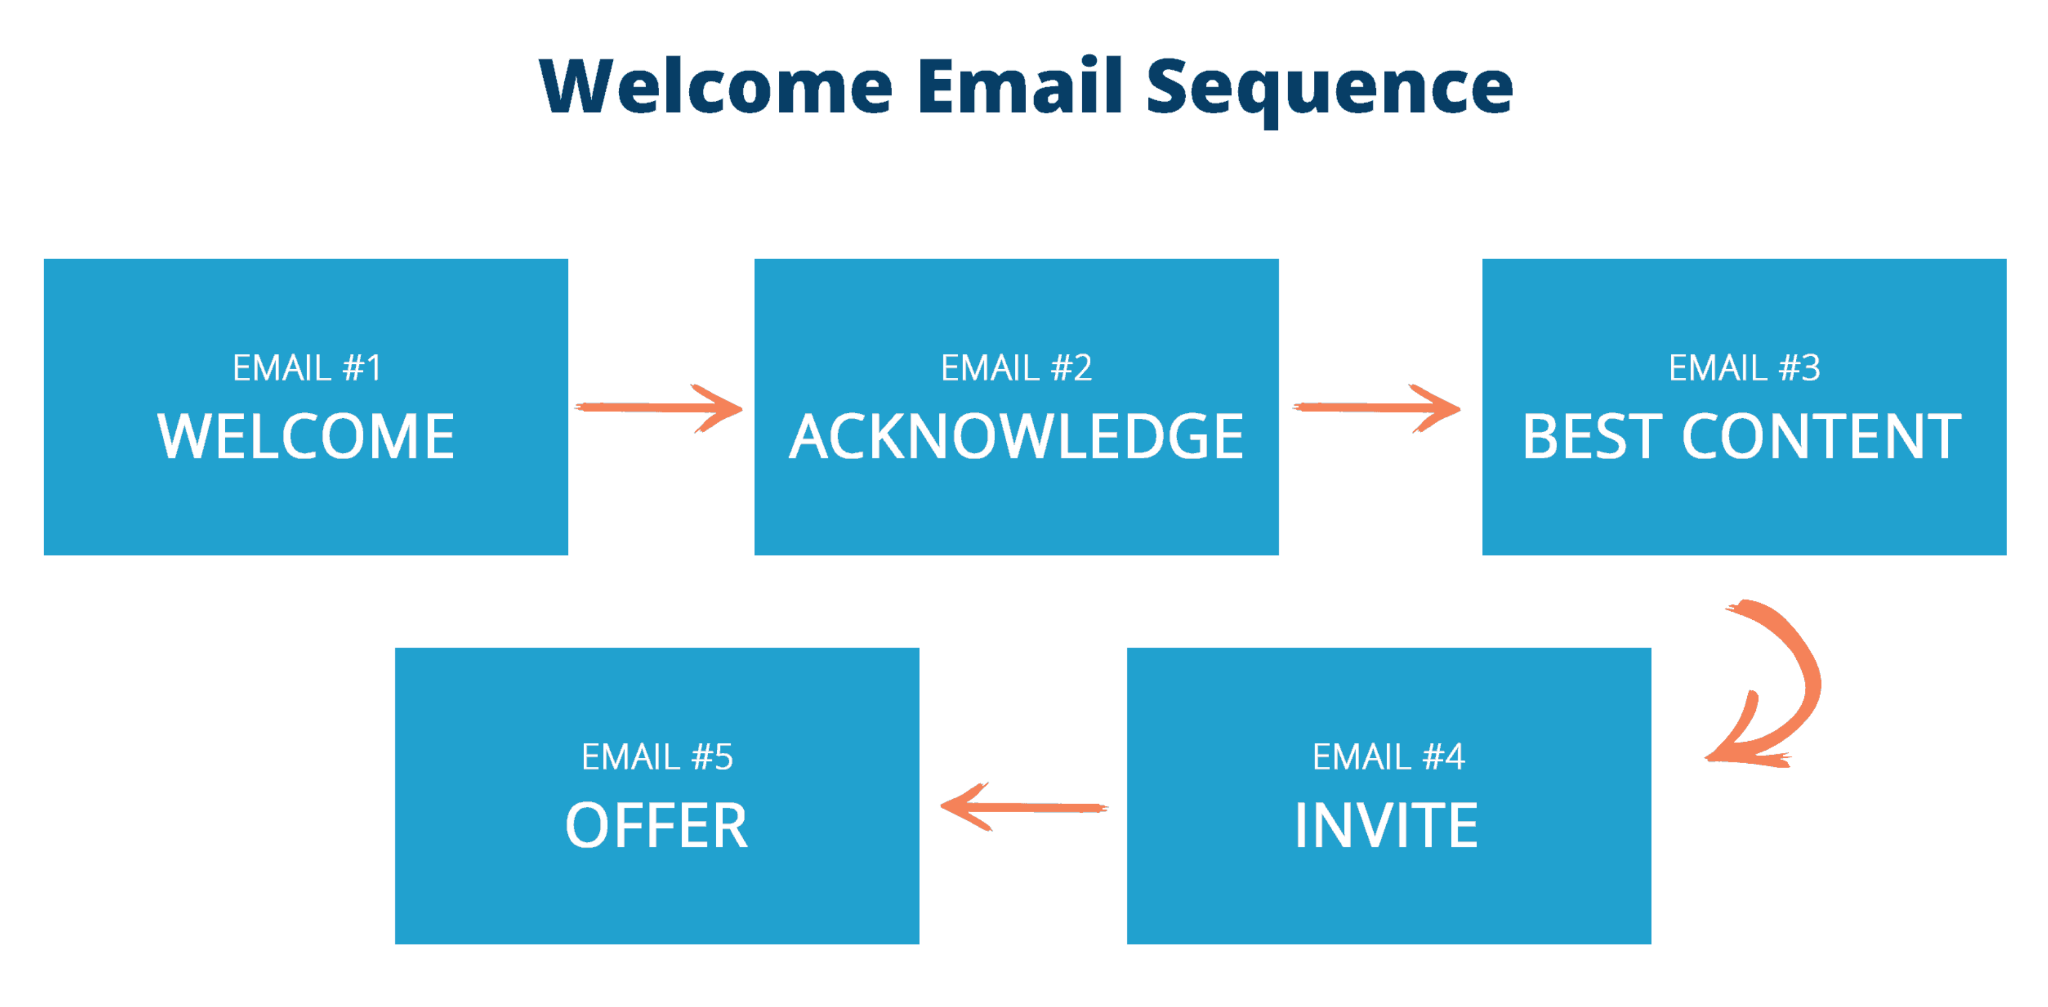
A well-planned sequence typically contains 3–5 emails, spaced over several days to ensure subscribers are engaged but not overwhelmed. Each email should serve a distinct purpose while building on the previous one.
Email 1: Welcome and Introduction
This is your first impression. Thank the subscriber for joining, introduce your brand’s mission, and give a glimpse of what they can expect. Including a friendly CTA, like “Explore Our Bestsellers” or “Discover More About Us,” encourages immediate engagement.
Email 2: Provide Value
Offer something tangible and useful, such as a free guide, how-to tutorial, or exclusive discount. Providing value early demonstrates that your brand is focused on helping subscribers rather than only selling to them.
Email 3: Social Proof and Testimonials
Sharing customer reviews, case studies, or media mentions establishes credibility. Highlight the benefits of your products or services to create trust and persuade hesitant subscribers to take action. To collect reviews more easily, you can use Ryviu to ask customers to leave reviews after purchases.
Email 4: Drive Action
Now it’s time to motivate the subscriber toward a specific goal, making their first purchase, booking a demo, or signing up for a webinar. Limited-time offers or exclusive incentives create urgency and encourage conversions.
Email 5 (Optional): Follow-Up/Reminder
This email targets subscribers who haven’t yet taken action. Remind them of your offer, showcase popular products, or provide additional value to nudge them toward engagement.
With your sequence structured, the next step is choosing the tools that allow you to automate and scale your efforts.
Automation allows you to deliver the right email to the right subscriber at the right time. Several tools make it easy to create, schedule, and optimize your welcome sequence:
Action Step: Select a platform that aligns with your business type, technical comfort, and budget. Once chosen, set up a new automation workflow and define your trigger, usually “Subscriber Joins List” or “First Purchase.”
After selecting your tool, crafting the emails themselves is the next critical step.
Automation alone won’t drive results unless your emails are engaging, persuasive, and actionable. Focus on these key elements when crafting each email:
With your emails written, it’s time to set up a sequence that automates their delivery and maximizes impact.
After writing your emails, the next step is automation. Setting up a workflow ensures the right email reaches the right subscriber at the right time.
Action Step: Regularly monitor open rates, click-through rates, and conversion metrics. Use these insights to refine your sequence and boost performance over time.
Personalization is the final key element to take your automated sequence to the next level.
Subscribers respond best to content that feels relevant and timely. Personalization goes beyond inserting a first name, it’s about delivering content tailored to each subscriber’s behavior and preferences:
Personalized, timely emails not only increase engagement but also foster long-term loyalty, turning subscribers into repeat customers.
Automating a high-converting welcome email sequence is an investment that pays dividends in both engagement and revenue. By understanding your audience, carefully planning a multi-step sequence, selecting the right automation tool, crafting compelling content, and optimizing based on performance, you can create a sequence that not only welcomes subscribers but also guides them toward meaningful actions.
Remember, success lies in testing, refining, and personalizing your approach. When done correctly, your welcome email sequence becomes one of your most effective marketing assets, capable of turning new subscribers into loyal, lifelong customers.